Cone
Pipe intricate designs and greetings using a homemade parchment paper piping bag.
Fold parchment into a cone, or cornet, using the steps below and start decorating your cakes and cookies like the pros.
1. For fine detail work or to decorate cookies with multiple colors, you'll need to make your own piping bags.
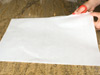
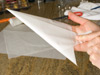
Start by tearing off a sheet of parchment, if you're using a roll of paper. (Or fold a full sheet-pan sized piece and cut it in half, as shown here.)
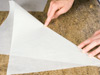
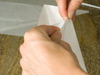
2. Fold the rectangle diagonally, using your fingernail or the back of a knife blade to make a strong crease.
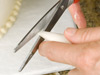
3. Use sharp scissors or a knife blade to cut the paper along the crease. You'll now have two triangles, enough for two parchment cones.
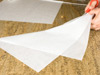
4. Hold the triangle so that the right angle is in your right hand. Bring the top left corner of the paper to meet the right corner, tucking it under your thumb to make a cone shape.
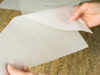
5. Bring the "tail" up around the cone, wrapping the remaining paper around the body of the cone again and pulling the tail end tight. Adjust it as needed to make sure the point of the cone is sharp.
6. Fold the tail end into the cone. Use your fingernail to crease the rim of the cone.
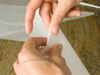
7. The tail end is tucked in on the seam side of the cone. Once you've filled the cone with icing, hold the seam side away from you and fold down the top part of the bag towards you. This keeps the bag tight, so it won't unravel, and gives you better control as you pipe.
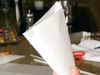
8. Fill the cone no more than two-thirds full of frosting, or it'll squeeze out the top once you exert pressure on the bag. Fold in the left and right corners, and then fold the top over again before you begin. You can keep folding the top down as you use up the frosting (think of a tube of toothpaste).
9. If you're using different colors of icing, have the bags all filled and ready to go before you start decorating. Use a sharp paring knife or scissors to snip off the point of the cone.

10. Start decorating! It's a good idea to practice piping a few swirls or letters on a plate or an extra piece of parchment before starting in on a cake or other finished project.
For more decorating tips, see our other cookie- and cake-decorating articles.
No comments:
Post a Comment